Me Made
  • Home
  • Blog
  • Contact
  • Links

Dragon Tee Tutorial

4/12/2017

2 Comments

 
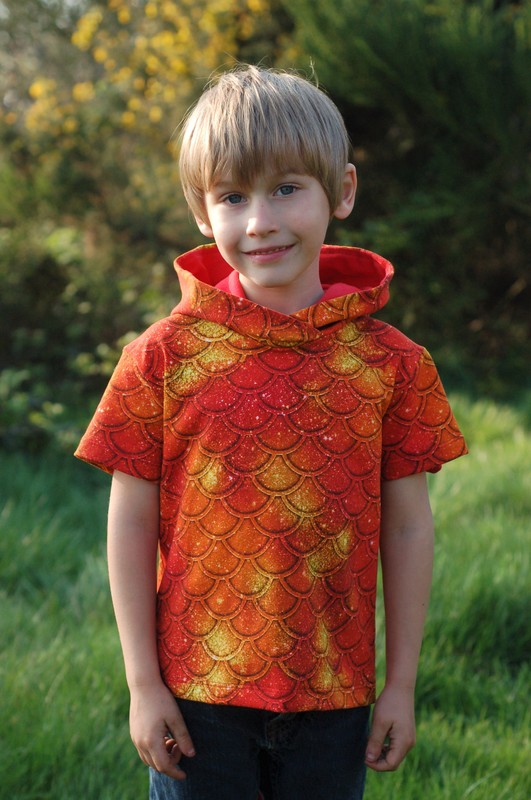
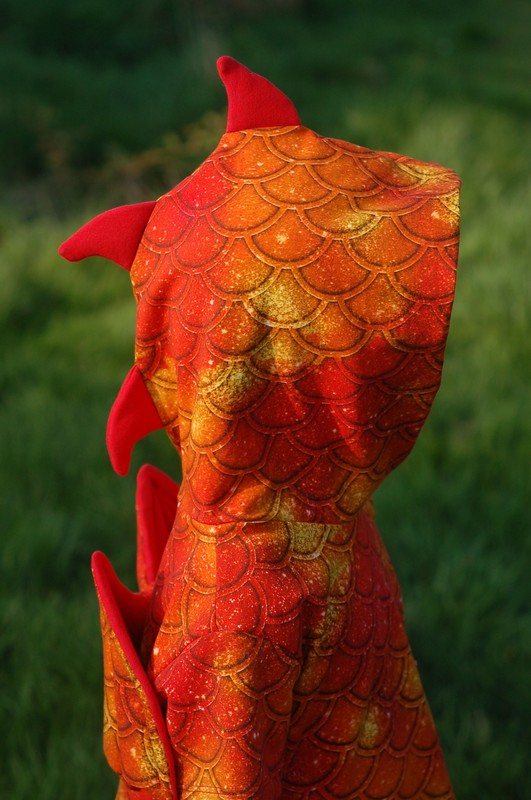
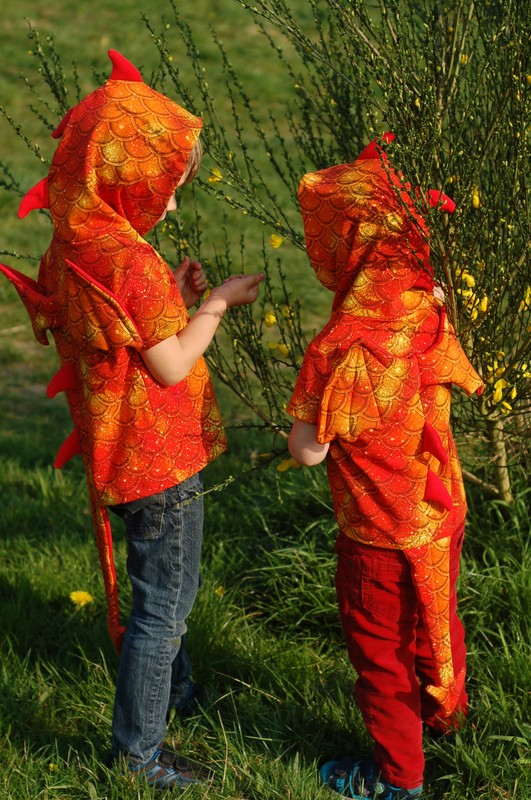
Earlier this week, I shared some photos of these tees I made my boys with the amazing custom Fire Scales Fabric from Rumpled Stitchings flash preorder (Closes 15th April 2017, be quick!) and had so many requests for the pattern name that I agreed to upload the templates I used along with instructions to my blog so you can make your own! My boys have literally worn these solidly since the photos were taken and I'm pretty sure your little people will love them too ;)
*** PLEASE NOTE ***
​ It is ESSENTIAL you check your local laws and make sure they fully comply whether gifting or selling.  EG. In the UK these would class as dressing up and need CE testing & marking etc and as the maker that is your responsibility. Alter the templates as needed to comply.
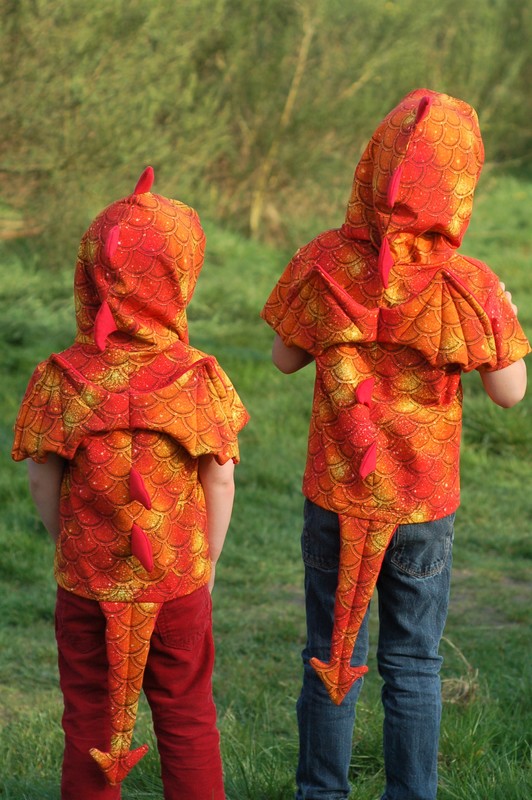
Picture

Materials List

  • Jersey knit fabric as per your pattern requirements plus extra.
  • Scraps of fusible interfacing or stay tape for stabilising purposes
  • Suitable sheet wadding (I used 270g weight)

Tutorial

  1. Start with a well fitting t-shirt pattern which includes a hood with a centre seam. (I used the MBJM Hot Chocolate as a base pattern leaving off the bottom band and making the sleeves short in length)
  2. Print the templates below for the wings, tail and spikes or draw your own, altering to ensure all requirements are met for compliance & law purposes
  3. Prepare the back pattern piece.  a) If your pattern piece is a 'cut on the fold' type piece, you don't need to do anything here, instead when cutting, simply move the pattern piece slightly away from the fold of the fabric and cut 1cm away from the edge of the pattern piece on the edge you would usually line up with the fold.  b) If you have a full pattern piece for the back, draw a line down the centre back, then another one 1cm away on either side marking that line with the words, 'cut on fold'. Cut down the 2nd line you drew and discard the side without the centre back line and then do as described in 3a.
  4. From main fabric, cut 1x Front, 2x Back (mirrored), 2x Sleeve (mirrored), 2 x Hood (mirrored), 2x Wings (mirrored), 1x Tail
  5. From Lining fabric, cut 2x Hood (mirrored, optional but looks best), 2x Wings (mirrored) and 10x Spikes (5 pairs mirrored)
  6. Apply 1.5cm wide lengths of interfacing to the back pattern pieces, the entire length of the centre back raw edges.
  7. Using a 1cm Seam Allowance, sew the wings, tail and spikes by layering wadding, main fabric right sides up and lining fabric right sides down, leaving the shortest sides (the one which will be attached the top) unstitched.
  8. Trim seam allowances on all sewn edges, clipping and notching curves and points where needed.
  9. Turn all pieces the right way out, using your fingers or blunt object such as a chopstick or lidded pen to gently push the edges out
  10. Baste closed all the open edges with a 6mm seam allowance.
  11. Draw then sew or freehand sew the 'veins' to the wings and tail.
  12. Construct the outer hood. Lay 1 hood main piece down, right sides up. Arrange 3 'spikes' around the hood with raw edges matching and ensuring the spikes are facing the right way. Lay the second main fabric hood right sides down on top, matching raw edges and pin or clip all 3 layers together. Sew with the pattern specified seam allowance.
  13. Construct the back. Lay 1 back piece down right sides up. Arrange the wings right sides together around 1/3rd down from the top matching raw edges, then arrange the 2 remaining spikes equally beneath the wings, raw edges aligned. Lay the 2nd back piece down on top, right sides down, raw edges matching and pin or clip entire seam. Sew with a 1cm seam allowance. 
  14. Sew the back, front, sleeves and hood together as per the pattern, hem the sleeves, stop before sewing the bottom hem.
  15. Lay the t-shirt down with back facing up towards you. lay the tail on top, right side facing down, aligning raw edges with the bottom raw hem and centre back seam (tail will go upwards and point towards the hood, tail lining will be the side you see). Pin or clip and sew tail on with a 6mm seam allowance, sew again with a 15mm and then a 25mm seam allowance.
  16. Fold tail down and hem the whole tee with a 25mm seam allowance
  17. If regulations allow it, tack down the wings at the sleeve seams.
  18. You're Done! Upload a photo or link in the comments!
Picture
Picture
Picture
Picture

Templates

Click HERE to open the templates up, then print at 100%. 
2 Comments
Elizabeth R. Herbert link
12/5/2017 09:09:16 pm

Thanks for this beautiful, useful project! Your instructions with the up-close images are so clear.

Reply
North Shore link
6/15/2020 05:37:52 am

I was very pleased to find this web-site. I wanted to thanks for your time for this wonderful read!! I definitely enjoying every little bit of it and I have you bookmarked to check out new stuff you blog post.

Reply


Leave a Reply.

    Author

    Hi! I'm Sarah and I live with my 2 boys and my Husband in East Anglia, UK.  I enjoy sewing for my family and it is my aim to have a completely MeMade wardrobe for us all!

    Archives

    January 2019
    May 2018
    November 2017
    September 2017
    August 2017
    July 2017
    June 2017
    May 2017
    April 2017
    March 2017
    February 2017
    January 2017
    December 2016
    November 2016
    September 2016
    August 2016
    July 2016
    June 2016
    May 2016
    April 2016
    March 2016
    February 2016
    January 2016
    December 2015
    November 2015
    May 2015

    Categories

    All
    Accessory
    Autumn
    Baste+Gather
    Bella Sunshine Designs
    Bishy Barnababes
    Blogtour
    Blog Tour
    Boys
    Buttons
    Cardigan
    Children
    Coat
    Colour Blocking
    Costume
    Daddy & Me
    Denim
    Dress
    Dressing Up
    Duck Butt Designs
    EYMM
    Fabric
    Formal
    Girls
    Girs
    Gracious Threads
    Gym
    Hoodies
    Itch To Stitch
    Jacket
    Jalie
    Jeans
    Jersey
    Jersey Jollies
    JK Jersey
    Jumper
    Jumpsuit
    Kelly J Designs
    Ladies
    Laela Jeyne
    Lil Luxe Collection
    Little Finch
    Lounge Wear
    Love Notions
    Lulus Fabric UK
    Matching
    Maxi Dress
    MBJM
    MeMadeMay
    Mens
    Mummy & Me
    New Horizons
    NewLook
    Occasion Wear
    PDF
    Peek A Boo
    Peek-a-Boo
    Pickle Toes
    Pockets
    Pyjamas
    Rumpled Stitching
    Scuba
    Seamingly Smitten
    Separates
    Sew By Pattern Pieces
    Sew Straight & Gather
    Shirt
    Shorts
    Skirt
    Softshell
    Splashings Of Fabric
    Stitch Upon A Time
    Summer
    Swimwear
    Tee
    Terra's Treasure
    Thread Theory
    Tops
    Trousers
    Tutorial
    Underwear
    Upcycle
    Wardrobe By Me
    Women
    Work

    RSS Feed

    Affiliate Links

    Picture
    Picture
    Picture
    200x200
    Picture
    Picture
Powered by Create your own unique website with customizable templates.
  • Home
  • Blog
  • Contact
  • Links